Originally posted at: medium.com/lawnstarter-engineering
When we started our first rewrite into React Native in late 2017, we knew our app was going to have quite a few forms that our providers would need to fill out - especially when first onboarding onto our platform.
On the web, we were pretty familiar with a variety of the web APIs and libraries out there that offer form validation and an ability to scroll to the first invalid input-something that we insisted on having due to the existence of a few long forms - but with React Native there wasn’t much available at the time, which is how we ended up rolling our own.
Over these next few posts, we’ll go over how we built our logic, some of the caveats to be aware of in this approach, and finally some of the improvements that can be made upon it.
If you want to jump ahead and see the demo app that this tutorial created, you can do so here.
Validation
The first step will be creating a service so we can validate our inputs against a defined dictionary of validation logic. For this, we first need to install Validate.js as a helper library. The nice thing about this library is that it’s a pure Javascript solution, so there’s no need to worry about any framework-specific constraints - so if you eventually want to port your validation over to the web or a different mobile framework, you can.
The first step in setting up Validate.js is to create a dictionary of all the different unique types of input fields you’ll have and the validation rules for each. Reading though the documentation on this will definitely help - but here’s an example of some of our rules to give you some context:
export const validationDictionary = {
  bool: {
    presence: {
      allowEmpty: false,
      message: "^This is required"
    }
  },

  day: {
    presence: {
      allowEmpty: false,
      message: "^This is required"
    },
    numericality: {
      greaterThan: 0,
      lessThanOrEqualTo: 31,
      message: "^Must be valid"
    }
  },

  email: {
    presence: {
      allowEmpty: false,
      message: "^This is required"
    },
    email: {
      message: "^Email address must be valid"
    }
  }
};
Now that we have our dictionary setup, let’s look at what the local state on one of our forms will look like.
this.state = {
  inputs: {
    first_name: {
      type: "generic",
      value: ""
    },
    last_name: {
      type: "generic",
      value: ""
    },
    birthday_month: {
      type: "month",
      value: ""
    },
    birthday_day: {
      type: "day",
      value: ""
    }
  }
};
As you can see, we’ve nested all of our inputs within an inputs object on our state to keep it organized. Then, each individual input has its own object with two key pieces nested within it. First is the type, which is a string representation linked to the type of validation we want to perform on the input. Next is the value, which is where the input’s value will be stored. Also note that the key of each input is uniquely tied to the input in reference.
Next, let’s create some helper methods that we’ll utilize to validate our inputs. For ease of explaining how these helper methods will work - imagine we’re validating an input defined as day which permits integers from 1 to 31 and the user has just typed 32 into the input.
function validateInput({ type, value }) {
  const result = validatejs(
    {
      [type]: value
    },
    {
      [type]: validationDictionary[type]
    }
  );

  if (result) {
    return result[type][0];
  }

  return null;
}
First, we’ll setup the main helper that’s going to be validating our input called validateInput. This method will take two parameters, type (‘day’) and value (32). Within this method, we immediately call Validate.js with two parameters - the first is an object of our type and value, and the second is an object of the validation we want to check against from our dictionary (make sure your validationDictionary exists for this helper to reference). If that call produces a result - which in this case it would because our dictionary enforces numbers between 1 and 31, the error of "Must be valid" will be returned.
function getInputValidationState({ input, value }) {
  return {
    ...input,
    value,
    errorLabel: input.optional
      ? null
      : validateInput({ type: input.type, value })
  };
}
Next, we’ll create a helper method called getInputValidationState. This method will be updating the state.inputs.day object by first spreading out all of the existing parameters, and then explicitly updating the errorLabel parameter (as long as the input hasn’t been flagged as optional) by calling the validateInput method we just created.
function onInputChange({ id, value, cb = () => {} }) {
  const { inputs } = this.state;
  this.setState(
    {
      inputs: {
        ...inputs,
        [id]: getInputValidationState({
          input: inputs[id],
          value
        })
      }
    },
    cb
  );
}
Finally, we need a helper method that we’ll link directly into the change event on our input (i.e the onChangeText prop on a TextInput). This method will not only update state.inputs.day.value, but also actually perform the validation and return all information in regards to it. To do this, we’ll create an onInputChange helper that will take three parameters. First, an id that is a string representation of the input’s unique key - day in this instance. Next, the value (32) of the input. And finally, an optional callback method. We will need to bind this method to our constructor so it has access to state, which will allow us to pull the entire object for that specific input off.
this.onInputChange = validationService.onInputChange.bind(this);
Now that we’ve got our helpers setup, let’s go back to the setup of our form. The beauty of the service we just created is that it can validate any structure of data as long as your dictionary is setup to parse it (again, refer to the documentation for more assistance with complex rules). But for the sake of simplicity, I’ll validate a few TextInput components using our onInputChange method.
  renderError(id) {
    const { inputs } = this.state;
    if (inputs[id].errorLabel) {
      return <Text style={styles.error}>{inputs[id].errorLabel}</Text>;
    }
    return null;
  }

  render() {
    return (
      <View style={styles.container}>
        <ScrollView>
          <View>
            <Text>First Name</Text>
            <TextInput
              style={styles.input}
              onChangeText={value => {
                this.onInputChange({ id: "first_name", value });
              }}
            />
            {this.renderError("first_name")}
          </View>
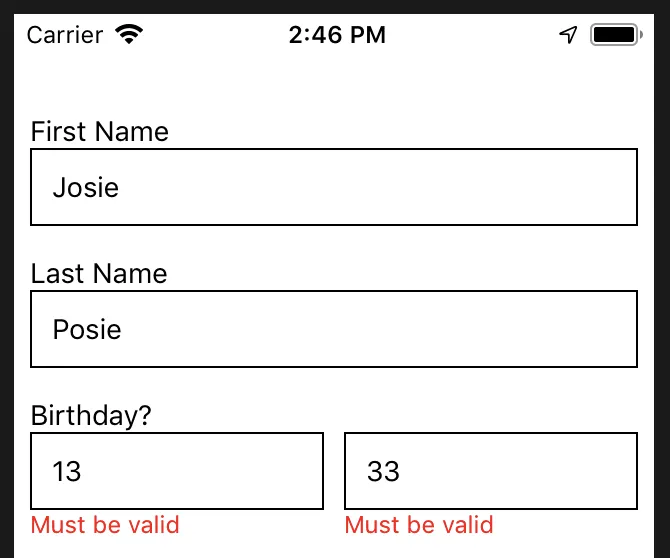
Here’s a snippet of what our form looks like when it’s all set up. Essentially, we’ve got four inputs that all have validation checks, and a helpful renderError method that looks to see if the errorLabel key on any of our individual inputs is truthy. If it is, we render the error.
Great, now that we have individual inputs validating -but what about if we wanted to validate the entire form all at once? Let’s create a new helper method called getFormValidation to do that.
function getFormValidation() {
  const { inputs } = this.state;

  const updatedInputs = {};

  for (const [key, input] of Object.entries(inputs)) {
    updatedInputs[key] = getInputValidationState({
      input,
      value: input.value
    });
  }

  this.setState({
    inputs: updatedInputs
  });
}
For this helper method, we’re going to iterate over the entire inputs object and run a validation check on each input. As we run this validation, we rebuild the inputs object and then set it to state. Make sure you bind this one to the constructor too, then throw a button on your form and test calling this method.

Now our form is setup with our base validation logic.
Next Steps
That’s all for this first part. In part two, we’ll go over setting up “scroll to invalid” logic so we can ensure that if we have a long form and our user forgets to enter in a field on the top input - we bring them right to that point on the form.